Friday, 28 September 2018

How to Update the Cloud Tooling(dbaastools) on Database Cloud Service


Connect as the “opc” user to the compute node

login as: opc
Authenticating with public key "imported-openssh-key".

Start a root-user command shell:

[opc@ABC ~]$ sudo -s

Check whether any cloud tooling updates are available:

[root@ABC opc]# dbaascli dbpatchm --run -list_tools
DBAAS CLI version 1.0.0
Executing command dbpatchm --run -list_tools -cli
/var/opt/oracle/patch/dbpatchm -list_tools -cli
Subroutine sync_dg_standby redefined at /var/opt/oracle/patch/dbpatchm line 7383.
Starting DBPATCHM
Logfile is /var/opt/oracle/log/dbpatchm/dbpatchm_2018-06-09_14:46:24.log
Config file is /var/opt/oracle/patch/dbpatchm.cfg

INFO: cdb is set to : yes
INFO: dbversion detected : 18000
INFO: patching type : psu


Patchid : 18.2.3.1.0_180606.0000
dbpatchm Execution completed

Check your current version of cloud tooling:

[root@ABC opc]# rpm -qa|grep -i dbaastools
dbaastools-1.0-1+18.2.3.1.0_180530.0000.x86_64

Download and apply the patch containing the cloud tooling update:

patch-id is the patch ID you located in the previous step
[root@ABC opc]# dbaascli dbpatchm --run -toolsinst -rpmversion=18.2.3.1.0_180606.0000
DBAAS CLI version 1.0.0
Executing command dbpatchm --run -toolsinst -rpmversion=18.2.3.1.0_180606.0000 -cli
/var/opt/oracle/patch/dbpatchm -toolsinst -rpmversion=18.2.3.1.0_180606.0000 -cli
Subroutine sync_dg_standby redefined at /var/opt/oracle/patch/dbpatchm line 7383.
Use of uninitialized value in concatenation (.) or string at /var/opt/oracle/patch/dbpatchm line 5016.
Starting DBPATCHM
Logfile is /var/opt/oracle/log/dbpatchm/dbpatchm_2018-06-09_14:48:28.log
Config file is /var/opt/oracle/patch/dbpatchm.cfg

INFO: cdb is set to : yes
INFO: dbversion detected : 18000
INFO: patching type : psu

INFO: existing dbaastools version - dbaastools-1.0-1+18.2.3.1.0_180530.0000.x86_64

INFO: updated dbaastools rpm to - dbaastools-1.0-1+18.2.3.1.0_180606.0000.x86_64
dbpatchm Execution completed

[root@ABC opc]#

Verify the Updated Version

[root@ABC opc]# rpm -qa|grep -i dbaastools
dbaastools-1.0-1+18.2.3.1.0_180606.0000.x86_64

Check Available Updates

[root@ABC opc]# dbaascli dbpatchm --run -list_tools
DBAAS CLI version 1.0.0
Executing command dbpatchm --run -list_tools -cli
/var/opt/oracle/patch/dbpatchm -list_tools -cli
Subroutine sync_dg_standby redefined at /var/opt/oracle/patch/dbpatchm line 7383.
Starting DBPATCHM
Logfile is /var/opt/oracle/log/dbpatchm/dbpatchm_2018-06-09_14:58:16.log
Config file is /var/opt/oracle/patch/dbpatchm.cfg

INFO: cdb is set to : yes
INFO: dbversion detected : 18000
INFO: patching type : psu


No applicable dbaastools rpms found
dbpatchm Execution completed

Reset the backup configuration

[root@ABC opc]# /var/opt/oracle/ocde/assistants/bkup/bkup
Starting BKUP
Logfile is /var/opt/oracle/log/bkup/bkup_2018-06-09_15:00:12.log
Config file is /var/opt/oracle/ocde/assistants/bkup/bkup.cfg
dbname: ORCL
Dataguard configuration
Enabled: 0
Mode: PRIMARY
INFO : No backup strategy enabled.
Looking for previous configuration:
Directory : /home/oracle/bkup/ORCL
 -> obkup
 -> Found: 1 files
 -> Moving previous configuration to /home/oracle/bkup/ORCL_20180609150026
No initial bkup of PFILE needed.
Common RMAN Config
Instantiating obkup
Instantiating dbcfg.spec
Updating Control File Record Keep Time
Enabling block change tracking
Updating RMAN defaults
INFO: Archivelog management enabled.
Adding entry to crontab
Accessing to your Database ID ..
The DBaaS instance database id is: 1505878300
Deleting unencrypted autobackups.
#### Completed Execution.
[root@ABC opc]#
If you are updating cloud tooling on a database deployment hosting a Data Guard
configuration, repeat the preceding steps on the other compute node of the
deployment.

Thursday, 27 September 2018

How to Reset Password for dbaas_monitor User


Execute below Steps to Reset DBAAS_MONITOR User Password while connecting to root user:

Connect to Database Compute Node using ROOT User.

cd /u01/app/oracle/product/ords/
java -jar ords.war user dbaas_monitor "OSAdmin"
chown oracle:oinstall /u01/app/oracle/product/ords/conf/ords/credentials
chmod 644 /u01/app/oracle/product/ords/conf/ords/credentials

Saturday, 15 September 2018

ORA-16139: media recovery required SWITCHOVER_STATUS SWITCHOVER LATENT

SQL> select switchover_status from v$database;

SWITCHOVER_STATUS
--------------------
SWITCHOVER LATENT

SQL> alter database commit to switchover to primary with session shutdown;
alter database commit to switchover to primary with session shutdown
*
ERROR at line 1:
ORA-16139: media recovery required


SQL> RECOVER MANAGED STANDBY DATABASE FINISH;
Media recovery complete.
SQL> ALTER DATABASE COMMIT TO SWITCHOVER TO PRIMARY;

Database altered.

SQL> select switchover_status from v$database;

SWITCHOVER_STATUS
--------------------
NOT ALLOWED

SQL> select db_unique_name,database_role,switchover_status from v$database;

DB_UNIQUE_NAME                 DATABASE_ROLE    SWITCHOVER_STATUS
------------------------------ ---------------- --------------------
MEDDB                          PRIMARY          NOT ALLOWED


SQL> alter database open;

Wednesday, 15 August 2018

NoClassDefFoundError – com/jacob/com/ComFailException

NoClassDefFoundError – com/jacob/com/ComFailException
No Jacob
The reason for this error is because the Java cache may be interfering with properly finding the Java classes associated with jacob.jar. Clearing the Java cache should fix the problem:
  1. Open up the Control Panel on the end user’s PC
  2. Go to All Control Panel Items and click “Java”
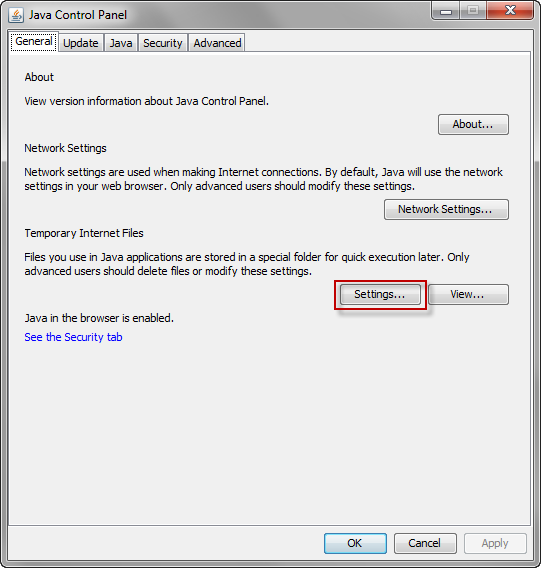
  3. With the General tab highlighted in the Java Control Panel, click “Settings…”Java Control Panel
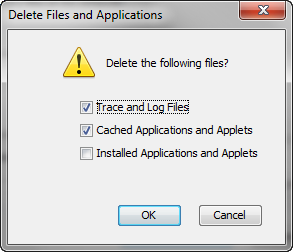
  4. Click “Delete Files…” to prepare to delete all objects in the Java cache. Delete Temporary Java Files
  5. In the new pop-up window, have only the following selected and click “OK”:
    • Trace and Log Files
    • Cached Applications and Applets
    • Clearing Java cache
  6. After the window closes, click “OK” twice to close all windows in the Java Control Panel.

Friday, 10 August 2018

Install and configure SFTP/FTP server in Oracle Linux

Step 1: We will use localhost for our machine to setup ftp server.

Step 2: Install vsftpd (very secure FTP daemon) package.
yum install -y vsftpd
Step 3: Start FTP Server when system on.
systemctl enable vsftpd.service
Step 4: Checking the status of ftp server
systemctl status vsftpd.service
Step 5: Configure vsftpd package. We will edit
/etc/vsftpd/vsftpd.conf
Change the line which contain anonymous_enable=NO to anonymous_enable=YES
This will give permit any one to access FTP server with authentication.
Change the following to YES
local_enable=YES
write_enable=YES
Step 6: Start FTP Server
systemctl start vsftpd.service
Step 7: Install FTP Client
yum install -y lftpd
Step 8: Connect ftp to localhost
lftp localhost

Monday, 6 August 2018

Signing JAR Files

$ORACLE_HOME/jdk/bin/jarsigner -keystore .keystore_myapp -storepass abcd1234 $ORACLE_HOME/forms/java/jacob.jar myapp

Enter keystore password:  mypassword
What is your first and last name?
  [Unknown]:  Concept
What is the name of your organizational unit?
  [Unknown]:  My Concept Department
What is the name of your organization?
  [Unknown]:  My Concept Company
What is the name of your City or Locality?
  [Unknown]:  My Concept City
What is the name of your State or Province?
  [Unknown]:  My Concept State
What is the two-letter country code for this unit?
  [Unknown]:  AE
Is CN=Concept, OU=My Concept Department, O=My Concept Company, L=My Concept City, ST=My Concept State, C=AE correct?
  [no]:  yes

Enter key password for
        (RETURN if same as keystore password):


/u01/app/oracle/product/12.2.1.3/oracle_common/jdk/bin/jarsigner -keystore .keystore_myapp -storepass abcd1234 $ORACLE_HOME/forms/java/jacob.jar myapp

VirtualBox Host-Only Static IP


To create a host-only connection in VirtualBox, start by opening the preferences in VirtualBox. Go to the "Network" tab, and addd a Host-only Network. 


To get the static IP address working temporarily, access the termainal on the client, and enter the following to assign a static IP to eth1. (I'm assuming 192.168.56.101 because that's VirtualBox's default. Make sure it matches the IP for your host-only adapter.)
ifconfig eth1 192.168.56.101 netmask 255.255.255.0 up

Number of Visitors